 Dimension Add Actual ( Drawing Editor )
Tool summary :
- Locate two or more points then right-click ( Return ) to add a dimension or dimension chain that shows actual distances between the located points.
- If User and Site Options > Drawings > "
 Confirm adding of dimensions " is turned on (checked), a confirmation step with Yes - No mouse bindings is provided at the end of the add operation.
Also see :
- Drawing Editor (where Dimension Add Actual is a tool)
- Edit Dimension (window for editing dimensions)
- Unshorten (before using Dimension Add Actual )
- Layer Panel (drawing layer the dimension will be added to)
- Adding extension dimensions (optional using Dimension Add Actual )
- Add Dimension (another way to Dimension Add Actual )
- The parts of a dimension (terms used to describe dimensions)
Setup and defaults :
Setup:
- Dimension terminals (arrows or slashes)
- Confirm adding of dimensions ( User and Site Options > Drawings > )
- Expand dimensions less than or equal to
- Material point dimension holdback distance
- The " Dimension pen color " for the legs and lines of automatically detailed and user-added dimensions is set in Drawing Presentation . To change this on individual drawings, you can reset the " Pen color " on the edit window.
- After Dimension Add Actual (or during Dimension Add Actual to place multiple dimensions), the last-added or last-edited dimension sets the defaults for subsequently added dimensions.
Step-by-step instructions :
The following instructions assume that you are using a 3-button mouse and that User and Site Options > Drawings > " Confirm adding of dimensions " is off (not checked).
1 . Before using this tool:
1a (optional) : Either allow the program to select a layer of its choosing -- or -- on the Layer Panel, select the drawing layer that you want to add the dimension to.
1b (if applicable) : To ensure accuracy of measurement, first Unshorten the drawing (if it has been shortened).
2 . Invoke Dimension Add Actual using any one (1) of the following methods:
▸ Click the Dimension Add Actual icon. The icon can be taken from the group named ' Objects -- Dimensions ' and placed on the ribbon.
▸ Dimension Add Actual can also be invoked using a keyboard shortcut , the context menu , or a mode . For the ' Lightning ' layout style, configuration of the interface is done using Customize Interface .
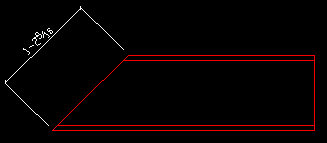
3 (optional) . The status line prompts, " Optional dimension line rotation: " Locate- Pan -Return mouse bindings are active. If you skip this step (alternative 1), the dimension line will be parallel with the imaginary line between the first two points you locate later in this procedure.
|
|
|
bindings |
Alternative 1 : Right-click ( Return ) if you want the dimension line to be parallel to an imaginary line through the 1st to-be-dimensioned point that you will locate (in step 4) and the 2nd to-be-dimensioned point that you locate (in step 5). Go to step 4.
Alternative 2 : The Locate option BSRL ( Base Real Line ) is selected by default. You can instead choose to use BSCL ( Base Construction Line ) or BSMB ( Base Member Line ) or PERP ( perpendicular ) or ANGL ( Angle ). Do one (1) of the following to set the rotation of the dimension line .:
|
BSRL is selected |
|
- If BSRL or BSCL or BSMB are selected, position the mouse pointer (
) next to a line or polygon side or construction line or member line that you want the dimension line to be parallel to and, when that line is highlighted, left-click ( Locate ).
- If PERP is selected, place the mouse pointer (
- If ANGL is selected, left-click ( Locate ) anywhere on screen, then enter the angle of rotation that you want for the dimension line
4 . Locate - Remove - Return mouse bindings become active.
|
|
|
bindings |
|
4a : Select the Locate icon that you want (if it's not pressed already).
4b : Position the mouse pointer (
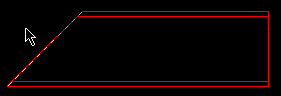
5 . An X appears at the point located in step 4. This X marks the base of the dimension leg .
|
|
|
bindings |
|
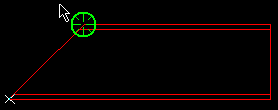
5a : Position the mouse pointer (
5b (optional) : If you mistakenly located the point in step 5a, middle-click ( Remove ) removes that point and lets you repeat step 5a.
6 . The status line prompts, " Locate dimension line :" Locate - Remove - Return mouse bindings are active.
|
|
|
bindings |
|
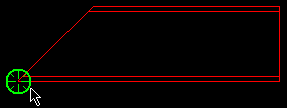
6a : Left-click ( Locate ) at any point through which you want the dimension line to be drawn. This dimension-line-placement point also sets the length of the dimension legs . A preview of the dimension is shown.
7 . A two-legged dimension is drawn on screen.
|
|
|
bindings |
|
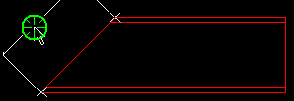
7a (optional) : Optionally left-click ( Locate ) more points to lay out a chain of dimensions that share the same dimension lines. If you locate too many points, middle-click ( Remove ) to remove the last point located.
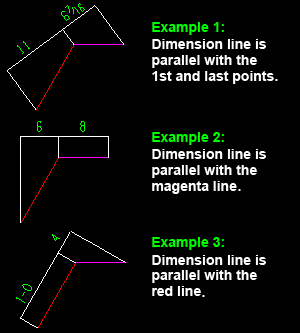
Three examples of dimension chains.
Example 1 was created by doing a right-click ( Return ) (alternative 1) in step 3 . .
Example 2 was created by selecting the magenta line (alternative 2) in step 3.
Example 3 was created by selecting the red line for the dimension line to be parallel with (alternative 2) in step 3.
7b : When you are done locating to-be-dimensioned points, right-click ( Return ).
Assuming that User and Site Options > Drawings > " Confirm adding of dimensions " is off (not checked), Locate- Pan -Return mouse bindings become active so that you can optionally add more dimensions.

bindings Alternative 1 : Right-click ( Return ) twice if you are done adding dimensions.
Alternative 2 : Follow these instructions beginning with step 3 to add another chain of actual dimensions.
Tip: Dimensions or dimension chains added using this procedure can be quickly removed (one chain at a time, in reverse-order of their addition) by using Undo .

